Showing posts with label Looks. Show all posts

Thursday, 4 September 2014

Blog As I Go Tutorial!

So I don't know if this is an actual thing but I thought I would blog what I'm doing and using makeup wise as I did it! This is 100% real life time trust me it is currently exactly 3pm on Wednesday 3rd Sep 14 so let's see how long this takes!
First I'm going to start by priming my t zone with this - (L'Oréal Nude Magique Blur Cream in light to medium skin)
Next I'll be applying L'Oréal Infallible foundation in the shade 140 golden beige - this shade is a bit too dark but is perfect with a tan. Plus this foundation is perfect for staying all day and honestly is 24H like it says!

After that I'm using my Rimmel Wake Me Up concealer to highlight under the eyes, down the bridge of my nose and to conceal any imperfections.

To set my face I'm using my Natural Collection Loose Powder in Neutral Translucent - this is perfect to keeping your base staying flawless all day and gives you a natural matte finish.

Then I just filled in my brows with my beloved elf Eyebrow Kit in dark :)

Next I bronzed my face with the Bronzing Summer Glow Kit by 17 and  contoured my cheeks and nose with Nars Laguna.

For my eyes I used the Sleek Au Naturel palette and placed the 2nd greyish shade all over my lid. I then placed the 5th shade which is a peachy orange into the crease. I darkened up the outer v on each eye by placing the warm brown shade there with a small fluffy brush by Estee Lauder. Using the same brush I placed the almost black shade on the outer V also and blended it all together with a clean fluffy brush from eBay (these eBay/china brushes are soooo good and incredibly cheap so I'll leave a link below if I can find them). 

Next I used my eyeko skinny liner to add a small wing which makes the black shadows draw into the centre of the eye without looking too heavy. Next i used my new favourite mascara - the volume million lashes so couture by L'Oréal. 

For my blush I used Benefits Coralista with a Real Techniques duo fibre face brush in order for the product to be applied more sparsely. I used the same brush to apply my highlight which was the MUA Undress Your Skin shimmer highlighter. For my lips I used Revlon Super Lustrous Matte lipstick in Smoked Peach 013.

MAKEUP BRUSHES: http://www.aliexpress.com/item/10-Pcs-Professional-Makeup-Brushes-Set-Makeup-Brushes-Kit-Free-Draw-String-Makeup-Bag/1836599605.html

I was stupid and forgot to take a selfie so you could see the finished product... the one photo that actually matters... well... if you create this look I'd love to see the different ways it came out haha! just respond with a photo :)

Thanks again!
Melissa xoxo

Monday, 1 September 2014

ELF UNBOXING HAUL! 💕


Hi everyone! If you haven't seen this already it was uploaded last week! You may have seen me talk about this video in vlogs before (I can't remember if I did!) but this was filmed way back in the beginning of June and I was finally able to edit it (even though my editing is rubbish). Thank you for being patient with me and here is my first PROPER REAL KINDA VIDEO!!! Soz for being embarrassing.

Melissa xoxoxo

Tuesday, 8 July 2014

London Zoo OOTD + MOTD

Last Wednesday I supervised a school trip to London Zoo (I hate London Zoo) and thought it would be a good opportunity to show a outfit of the day (ootd) and the makeup I wore as well (which I also had to carry on without reapplying for my whole shift at work straight after so my makeup survived about 14 hours of wear (or just about). 

For my makeup look, I really wanted to create a look that accentuated my eye shape as you may have noticed I have hugely round and large eyes which makes it difficult for me to wear certain winged liner. After watching like all of LustreLux's videos on Youtube (most specifically her video tutorial on her everyday cut crease makeup which I adore omg) it gave me the motivation to attempt something similar. Here I softened the cut crease and used natural toned shadows for it to be easily blended before lining my lids with my Eyeko Skinny liner. I paired this eye look with a simple pinkish nude - using e.l.f.'s lipstick in Rosy Tan and topping it with a clear gloss by Rimmel - this is really lip plumping and is a favourite recently.

For my outfit I wanted to keep it casual as I was only supporting a trip so I went for the iconic, t-shirt and jeans look and topped it off with my new stone/grey faux leather jacket from H&M. I have this jacket in black (which you may have seen before) but I ordered this one online and it arrived about a week ago so it wasn't until it arrived I realised it was exactly the same as my black one just in a different colour! This jacket makes any look more edgy but not too grungy as the black jacket does.
I paired it with this t-shirt - a men's shirt originally from UNIQLO but found in a charity shop. This cost me like four quid (bargainnnnnn) and is soooooo soft and a perfect fit for an oversized t-shirt for my shape. Plus I love the graphic font on it and how it's navy which just makes it so versatile.

I wore jeans as I said before with this outfit and these are some of my favourite jeans - they are Primark skinny jeans for eleven pounds and Primark change these jeans all the time - the fit, the stitching, the material, something just always changes every time I buy a new pair but these are the best I have found. They are so stretchy and soft plus they are very flattering (making dat butt look good). My only fault with these are that they fall down on me as they are quite big even though they are my size (but I find Primark sizing should not be trusted at all it is very messed up) so I do belt these every single time.
I wore my old low top converse with this outfit as I thought it could rain plus I would be walking through London all day so needed something remotely comfortable but hell I was wrong. I love these as they were my first pair of converse I bought (I only have two though??) yonks ago as converse are actually quite pricey. Especially for a teenager. So I bought these ones as I wanted something versatile like the black classic converse but also something unique as I was spending a fair share of my money on trainers so I picked the ones with the limited edition blue stitching - these also come with three different laces to choose from but I am pretty sure they don't sell these shoes anymore. 


So that concludes this brief OOTD and MOTD! Hope you enjoyed and if you like posts like these plus +1 it or comment below!

Thanks for reading, Melissa xoxo

Tuesday, 1 July 2014

Natural and Simple Bridal Look! Perfect for Summer ☀️

It's that time of year where it seems everyone is going to weddings. Either you yourself is getting married, one of your best friends or maybe you're just attending the reception but we all need a look that we can wear for the day. 

This look was so last minute of me that I decided to make it into a blog post after I wanted to put on a bit of light coverage makeup and made my hair into this bohemian bun. This look is so versatile and adaptable especially for the warmer months as you can wear it with different headbands or even with braids/plaits if you have the time and it is so much more easier to do than it looks! Thus, this look can be used for festivals looks for when your hair is a tad oily or if you have an event or such where you need your hair up but still like it looking flawlessly pretty. The makeup is too very gentle to wear when it's warmer as the base that I used was Clarins HydraQuench Tinted Moisturiser which has an SPF of 15 in it to keep the sun off you for the day and is light on the skin which let's it breathe. Below is what I used for each step of the makeup and how I did my hair for this Summer Bridal Look! 

To achieve the natural makeup, after applying the base I set it with MAC Skinfinish Natural as this is known to keep your foundation in place for the day - a must for special occasion makeup! I lightly contoured my cheekbones with Nars Laguna Bronzer to give my face a little dimension. I applied Benefit's Coralista blush to the apples of my cheeks to give it a natural flush to add to the natural and simple makeup look. 

I filled my brows in with my L'Oreal Brow Artiste pencil as a brow pencil gives the effect of my natural brows as you can easily mimic brow hairs when filling them in. This pencil is great as it comes with a tiny brush on the cap to comb through the brows before and after. Plus one end of the pencil is wax which you can easily set the brow in place with. Although the wax end of this pencil is very soft this means it runs down very very quickly so I don't use it every single time - especially when it was part of my everyday makeup routine.

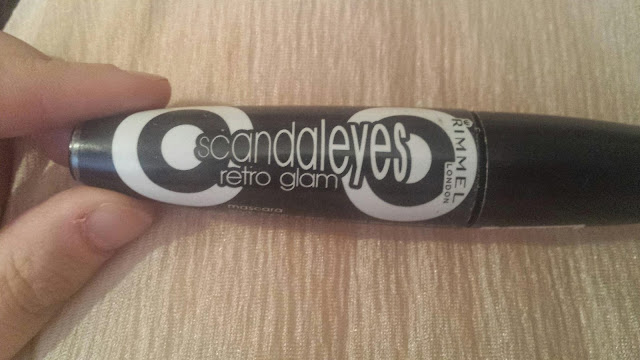
After filling my brows, I wanted to go for a 'barely there' look for the eyeshadow. I contoured my eyes by placing Laguna bronzer into the socket and crease from my brow bone towards the inner corner to make my eyes less rounded and more 'cat-eye' shaped. I used Benefit's long wearing shadow in the shade Call My Buff to highlight under my brows and in the tear duct area before placing a light petal pink shade from this Sleek palette shown below and mixed it with Call My Buff to place all over the lid and blended into the crease. I used my favourite mascara at the moment, Rimmel London's Scandaleyes RetroGlam mascara - this isn't a natural looking mascara but for this look I really wanted to achieve super long and thick lashes, just to give the look something that stands out for special occasion makeup. To make my eyes brighter, I used Rimmel London's white kohl eyeliner - white eyeliner is great for making your eyes look bigger or brighter and makes you look more awake so it's great in the mornings!

I used L'Oreal GlamShine Stain Splash in Lolita - a gorgeous natural pink coloured gloss - these glosses are just thick enough to last for long periods of time (great for special occasions such as weddings!) but they're not incredibly sticky and disgusting that makes you want to blot it every 20 minutes like some glosses. There's not a huge variety of shades but the colours that are available are perfect for everyday wear.

Moving onto the hair, I wanted to achieve a natural, beachy up-do and interpreted a version I saw on Youtube by Courtney Lundquist but I only curled the front sections of my hair that weren't up. So what I did is I sectioned off those front pieces first and curled them really tightly with a GHD flat iron and sprayed them with Pantene Pro V Ice Shine hairspray and separated the curls from the rest of my hair with the headband that is shown in the photos. I divided the rest of my hair into two top and bottom sections, forming the bottom half of my hair into a ballerina bun by twisting it and wrapping it around itself then securing it in place with a hair band. Afterwards, you just take sections from the top half of your hair and wrap them either over or under the bun you just created. As I said I didn't curl this section but in Courtney's video she did and I admit my hair would have looked a lot better if I had the time to curl it! After wrapping sections around the bun, you just pop in some bobby pins to secure it in place. I'd suggest using those pins that are made for this kind of look - they're grips designed for pinning hair in buns (I don't know what they're called but they are kind of like these I guess - Boots Hairpins) and if your headband is still in place you are pretty much finished when you have pinned all the hair back!

Thank you for reading! As always, if you have any requests please leave them below or email me! Melissa xoxo

Tuesday, 17 June 2014

High-End Rosy Makeup!

Today I was desperate to rediscover some of my higher priced products that i rarely used because a) I am lazy and use the same products and b) I am cheap and don't use high end stuff when I can use cheaper ALAS I realised that I actually own a bit of high end makeup and thought I would do a look as best I can using high end makeup. I also didn't want to do a full eye look today like I usually do - I wanted to do a simple look that's wearable for anyone and maybe even a 'no makeup' makeup look! That said, these are the products I used. *disclaimer: this is not sponsored but it turned into a little first impressions too soz lul*


I started priming my skin with the Smashbox Photo Finish Foundation Primer. I haven't used this that many times to say that it holds all my makeup in one place but I expect good things from it - it didn't necessarily smooth out my foundation when I put that on and give a smooth completion but my main aim of this foundation is that it increases the longevity of my base makeup and hopefully it pulls through!

Then I used the BB Skin Perfecting Cream (with SPF 25 - super great to wear during the summer as it's creamy and has a dewy finish) from Clarins in the shade 02 Medium. This wasn't as impressive as I thought as I thought it left my skin looking a bit patchy over perfect like it says on the tube! And for a thick and creamy foundation/base it's a light coverage. It says it is a light to medium coverage - I'd say more medium as it dis cover quite well but I'm just confused how the product is so thick when it's such a light coverage!

I used Benefit's Erase Paste on my undereye area to cancel out any dark circles and definitely does the trick however I prefer a brightening undereye concealer so I will probably be sticking to my Rimmel Match Perfection concealer. I used the shade No 2 Medium for the Erase Paste. After that I cheated a bit as I didn't have a light high end powder and used by e.l.f. Eye Brightener in Buff to set that undereye concealer. I set the rest of my face with MAC Mineralise Skinfinish Natural in Medium Plus with a Too Faced kabuki brush. 

Next I bronzed my face very lightly with Benefit's Dallas Bronzer using a Real Techniques Blush Brush. This is my sister's bronzer so I don't use it loads and I prefer shimmer bronzers like my Rimmel one I've usrd plenty of times! I contoured the hollows of my cheeks with Benefit's Hoola Bronzer which is my all time fave and I use it to contour anyway. I use a slanted and curved brush to contour which is very similar to the brush that Hoola comes with anyway!

For my blush I tend to use either Rockateur or Coralista anyway (from Benefit) but I sensed this look was becoming very Benefit heavy so I used a MAC blush which unfortunately I don't know the name of as I have had it agesssss and the sticker has come off on the packaging :(

Keeping the look natural, I didn't fill in my brows properly and just combed them through and ran a brown shadow through the tails of each brow to make them a little more defined. 

For my eye look I used a neutral tone brown, a transition shade (you can use any and I used the lighter brown in Sleek's Oh So Special palette) that I applied into the crease and onto the brown bone to give a more elongated look to the eyes - this is a good look if you have larger and more rounded eyes like me as it doesn't make them look smaller as such but more elongated and cat eye. I went over that briefly with an olive shadow from a No 7 trio I had lying around (It has no name but a number printed on the back - 220NN - I don't know if that helps anybody?) I blended that shade in my outer V and onto the brow bone slightly. I used Benefit's They're Real Mascara but was running out so topped it up with The Body Shop Super Volume Mascara in the shade 01 - this Body Shop mascara is actually really good at volumising definitely recommend!

Lastly, moving to my lip combo! I realised I didn't have a neutral or nude toned lippy so used Benefit's Bene-tint to almost line my lips before applying a lip colour in the shade Tutti-Cutie, also by Benefit.

I realise this is quite Benefit heavy but I honestly just own more Benefit cosmetics than I realised and a lot less other high end brands! Overall, I love how this look turned out natural but rosy and the makeup definitely blends better in the photos than how it does when I look in the mirror. Nonetheless, the makeup has blended a lot better now than it was earlier when I first applied it so I guess the creamy Clarins balm just needs to breathe a bit!

Thanks for reading! I hope to be posting a lot more now that I have no exams or school and especially as I don't go back to work for a further ten days! Thanks again and if you have any looks you would like to see I will try and see if I can do them! I wish I could have filmed this as a tutorial but you probably know the situation with my computers. I know. It is sad. I disappoint. :(
Thanks, Melissa xoxoxo


Monday, 16 June 2014

OOTD! 16th June 2014

This morning I had my last exam (thank god) and I was expecting to meet a friend for lunch when I had finished so this is what I wore this morning! (As in right now I am in trackies in bed). This evening I'm going up the pub so will be wearing the same outfit but a different top so the crop top was a tad too short for my liking! I will most likely be wearing the top I am wearing now which is a blue and grey baseball raglan tee from ASOS.

Biker jacket: H&M - £15 (Sale price)
Crop top: ASOS - £7 (Maybe? I can't really remember but it was almost definitely in the sale!)
Jeans: Leigh Topshop - £38 (thereabouts, I don't believe these particular ones are for sale anymore, they are quite thin and stretchy but they have similar jeans available)
Shoes: Converse at Office - £48

Sunday, 8 June 2014

Simple Dewy Makeup Look for Summer! + Quick OOTD

Here's how I achieved this simple makeup look which is lovely when it's gets a little warm and you want your makeup to last but it still to be "barely there"!

I started off with just a simple MUA primer, I know this one doesn't give me a matte finish on my skin which is nice for glowy or dewy skin. Then I buffed in my L'Oréal True Match foundation (I used the shade Golden Ivory) which is a perfect foundation as it gives you the ability to go matte if you want but glowy too as it blends with your natural tones! I used my Rimmel London Match Perfection Skin Tone Adapting concealer in 010 Ivory which gives that beautiful Kim Kardashian, highlighted glowy effect to the skin. I set my under eye area with e.l.f.'s Eye Brightener in the shade Buff. I set the rest of my face with a transparent powder by Collection and set any blemishes I had, and also around my nose and chin with L'Oréal True Match powder in Golden Ivory to keep them from looking oily and to keep redness at bay.

I then set my brows with my e.l.f. Brow Kit in Dark (with a tiny bit of a brown eyeshadow shade from the Sleek palette Au Naturel). I contoured my face very lightly with Benefit's Hoola bronzer and buffed it out with a kabuki after so it wasn't as harsh. I then used Nars Multiple in Orgasm for my blush, only on the highest points of my cheekbones.

For my eye look I stuck to one eyeshadow colour (this is not what usually happens I know), using a light rose-y gold colour from Sleek's Au Naturel palette by patting it all over the lid and then using a fluffy brush to blend it into the crease. I lined my eyes quite small with my L'Oréal Blackbuster Super Liner (I love this product HUGE recommend) and used my Max Factor Masterpiece Max mascara then topped my lashes with Rimmel London's Lash Accelerator Endless mascara.

On my lips I used my Nars Multiple in Orgasm and massaged it in and blotted before applying Revlon's Super Lustrous Lipstick in Pink Pout (all time fave lippy) and voilà the completed look!

Hope you enjoyed this kind of post - I'd do a video but I've explained the situation with my computers many times on my vlogs and the other blog posts are connected to the videos so they don't make sense without the vids so I feel like it would be pointless but anyway, I really enjoyed this look - I feel like it shows off the wearer's natural beauty and glow with the dewy skin and minimal liner (no wings) and long lovely lashes! Plus the glossy pink lip is very cute! Once again I apologise for the video/computer dilemma I am trying my best to fix it but it's not going as to plan at the moment, wish me luck!

Thanks, Melissa xoxo

P.S. Quick OOTD because I love this outfit it is so cute and is still summery without going to bright with colour (I know some people don't like lots of colour so this maybe ideal for you!) I wore this striped long sleeve t-shirt from New Look - I still believe they sell it online for four pounds in the sale - this shirt is very light as it's cotton. I paired it with this textured white skater skirt from Primark which is the first time I've worn it since I bought it (which was last year actually but still it's very light, a bit see-through) I paired this outfit with black slipper pumps as the only place I was going out was Sainsbury's and I had to wear closed toe shoes as I was wearing skin tone tights. Anyway I shall love you and leave you!!!